Types of Roofing Materials

From the gently sloping shingles of a cozy cottage to the dramatic pitched copper roofs of European cathedrals, the roof is an essential part of a home. It offers protection, contributes to a building’s energy efficiency, and serves as an expression of architectural style.

Roofing

A key component of the roof is sheathing, or decking. This is typically made from plywood or oriented strand board. Visit https://www.bostonroofingco.com/ to learn more.

The roof is a significant part of any home’s structural integrity and offers protection against the elements. It is therefore essential that it be made from the right materials to ensure durability and longevity. There are many different types of roofing materials to choose from, each with its own advantages and life lengths. Choosing the appropriate material will depend on a number of factors, including budget and aesthetic preference.

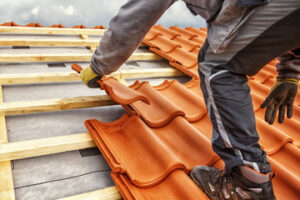
Asphalt shingles are a popular choice for new roofs due to their cost-effectiveness and range of color options. However, they do not offer much fire resistance and are less durable than other roofing materials. Slate roofs are a more luxurious option, and can last up to 100 years with regular maintenance. However, they are also more expensive and can be difficult to install on historical homes.

Metal roofs are another durable roofing option, and can last up to 50 years. They are available in a variety of finishes, such as aluminum, zinc, and copper. They are also a good choice for historic homes, as they can match the appearance of early shingles. However, some historical societies discourage the use of substitutes for original shingle materials, so it is important to check with them before making a decision.

A common flat roof material is EPDM membrane, which comes in large sheets that minimize the need for seams. It is then mechanically fastened to cover boards or insulation and sealed with a hot-air gun. This type of roof can be used in commercial buildings or on homes, and lasts 10-15 years.

Clay tile roofing was used extensively in colonial America and the 19th century, especially in areas of Spanish influence. It is also seen in revivalist styles such as Italianate and Richardson Romanesque, which favored rounded tiles.

Wood shingles were the most common roofing material from the earliest colonial days through to the 19th century. The quality, manufacturing techniques, and installation methods varied during this time. Some shingles looked similar to modern 3-tab shingles, and some resembled slate.

Decking

The roof deck is the essential layer of material positioned between the structural components of your home’s framing, such as trusses and rafters, and the outer roofing materials, including shingles or tiles. This critical component helps distribute the weight of the roof covering evenly and protects the inner layers from weather elements. Hence, it’s important to choose the right type of decking.

There are several different types of decking available, including plywood, oriented strand board (OSB), and wood plank sheathing. Each offers its own unique advantages. For example, OSB is engineered from overlapping wood strands and compressed for strength. This makes it less expensive than plywood and also resistant to moisture and rot. Meanwhile, plywood is made from many thin layers of cross-grained wood, which increases its durability, reduces splitting during nailing or cutting, and prevents warping over time.

When choosing your roof decking, consider the climate in your area and your budget. If you live in a region with high rainfall or humid conditions, moisture-resistant materials like OSB are a good choice. If you want a more traditional look, wood plank sheathing is an option that can provide a rustic or natural aesthetic.

Lastly, it’s important to choose a material that is durable and can withstand the load of your roof. If your home is located in an area with high winds, it’s recommended to use strong, thick, and long boards. If you choose to install a wood decking, make sure to use pressure-treated lumber or rot-resistant preservatives.

Once the decking is in place, it’s time to install the shingles or tiles of your choice. To ensure that the shingle or tile edges are properly secured, it’s a good idea to use a sealant. You should also use corrosion-resistant fasteners, especially when building in coastal areas.

In addition to the material used for your roof decking, other factors that determine the quality and cost of your roof include footings, trusses or rafters, and insulation. It’s also important to evaluate your home’s foundation and drainage system, as this will affect the longevity of your roof.

Collar beams

Collar beams are a common element in domestic roof construction. They are sometimes referred to as collar ties, but this is inaccurate. A tie in building construction works in tension rather than compression, and most collar ties are designed to keep rafters from sagging and not to connect ceiling joists.

Home inspectors should be familiar with the differences between these structural members, as they serve different purposes and have distinct requirements. A collar tie or rafter tie is a horizontal member that runs between two rafters. It is used to prevent rafters from detaching from the ridge, and it helps to distribute the load of the roof evenly. A ridge strap is another option for resisting uplift forces from wind.

Both a collar tie and a ridge strap are essential components of a roof frame, but they differ in terms of their purpose and requirements. A collar tie is a horizontal structural member that connects the rafters in a triangular roof truss. It is often found in houses with steeper slopes, and it helps to distribute the load of a roof evenly. It is also a good way to reduce the risk of sagging.

In addition to their function, collar ties can contribute to the aesthetics of a home’s interior or exterior. They can be crafted in a variety of styles and materials, from simple for a minimalist look to intricate and decorative for more ornate designs. Alternatively, they can be left exposed to create a rustic look.

When constructing a collar beam, it is important to ensure that it is properly sized and spaced. A poorly sized collar tie can lead to a number of problems, including sagging and loosening of the roof. This is why it is essential to consult a professional engineer before constructing a collar beam.

Some builders have questioned the need for collar ties, but they are essential for roof frames. They are particularly useful in high-pitched roofs where sagging is more likely to occur. Collar ties help to distribute the roof’s weight more evenly, which can reduce the risk of sagging. They can also minimize the deflection of undersized rafters by transferring some of the load to rafters on the other side.

Re-roofing

The roof of a home is one of the most important investments any homeowner can make. It protects the interior of the house and increases the property value. Therefore, it’s important to take care of any damage to the roof as soon as possible. A new roof can last for years and keep the structure of a building protected from weather elements. It is also an attractive feature that can add curb appeal to a home. However, determining whether the roof needs repair or replacement can be tricky. Many homeowners are unsure if the damage is severe enough to require a full roof replacement, or if a reroofing would be sufficient.

Re-roofing is a process of laying down an additional layer of shingles on an existing roof without tearing it off. It is often used on shingle roofs that are damaged or worn, but it’s not suitable for metal roofs and flat EPDM or PVC roofs. It’s not as durable as a full replacement, but it’s an affordable option for those who want to extend the life of their roof.

During the re-roofing process, special drip-edge flashings are installed at the eave and rake to prevent water leakage. The flashing can be made of metal, plastic or wood. In most cases, it is nailed down to the sheathing with nails driven at high points. Some roofers also install a layer of waterproof shingle underlayment (WSU) over the drip edge for added protection from moisture and sun damage.

A re-roofing job requires a lot of work and preparation. First, the old shingles are removed. Then, the succeeding courses of shingles are laid over the old shingles. At the ridge, the shingles are cut so that they butt closely together and do not overlap. The shingles are then secured with the help of a starter course. Finally, a ridge cap is placed at the end of each shingle row to protect it from moisture.

Recovering a roof is a time-consuming and expensive project, but it is an effective way to extend the lifespan of a roofing system. However, it’s important to consider the cost of a complete roof replacement before deciding on this solution. A full roof replacement will allow you to inspect the underlying layers of your roofing system, and will resolve any structural problems that may be hidden under the shingles.

Plastic Mold Repair – What You Need to Know

Properly repairing plastic molds can minimize downtime, increase productivity, and enhance product quality. Regular inspections, maintenance, and records will ensure optimal mold performance.

The first step is assessing the damaged area. This includes identifying potential problems and the extent of repairs needed. The surface is then cleaned and inspected for contaminants, oxides, and debris. Contact Plastic Mold Repair Florida now!

Laser welding is a powerful new plastic mold repair technique. It is used to make repairs on complex, delicate features in the mold that are difficult or impossible to reach with traditional refractory welding methods. It can also be used to fill in cracks and other surface defects without distorting the dimensional accuracy of the part. The process uses a highly focused laser beam to heat the material and fuse it to the existing part, repairing the defect and returning the mold to its original condition.

At the heart of laser welding is a special type of Nd:YAG laser, which emits a powerful infrared light at a wavelength that is easily absorbed by plastic and other materials. A Nd:YAG laser is able to reach the deepest parts of a part, and is especially useful for making long seams or fillet welds, or for making narrow spots in a mold. In addition to its versatility, a Nd:YAG laser is also inexpensive and easy to operate, making it an ideal choice for small precision welding shops that specialize in injection mold, die, and tooling repairs.

Before starting the repair, a Nd:YAG laser can be used to preheat a damaged part. This minimizes the risk of distortion of the part, and ensures that the weld is solid and strong. The laser can also be positioned to make welds in a wide range of directions. The resulting welds are generally very durable and can stand up to repeated injection molding processes, as well as the rigors of harsh manufacturing environments.

Lasers are used to make a variety of different weld types, including butt welds, edge flange welds, and filler lap welds. For most applications, however, the laser is used to make a weld without any additional metal filler. This reduces the amount of heat that is transferred to the base metal, minimizing changes in hardness in the area around the weld, and it also makes it possible to produce smoother surfaces and more consistent welds.

Laser welding received some criticism when it first emerged, but Alpha believes that most of the criticism was due to early lasers being under-powered and slowing down the process. Today’s high-powered Nd:YAG lasers, however, are fast and precise enough to work quickly on even large molds, allowing them to make welds in less time than other repair methods.

Grinding

Mold repair is a vital aspect of injection molding, as it extends the life of molds and helps ensure high-quality molded products. Performing regular maintenance and timely repairs can also reduce production costs and improve product quality. However, when a mold experiences significant damage, it may be time to consider replacement rather than repair. This is especially true if you’re experiencing problems such as flash, warpage, or dimensional inaccuracies.

A thorough inspection is the first step in plastic mold repair, as it allows for an evaluation of the condition of the injection mold. Injection molds are subjected to high pressures and temperatures, which can cause cracks or breaks. Other signs of wear include rust or corrosion, which can weaken the mold and shorten its lifespan. Other issues that need immediate attention include misalignment of the mold halves, worn ejector pins or bushings, and blockages in cooling channels and water lines.

After inspecting the mold, a technician can determine what repairs are required. A basic maintenance routine includes laser welding to fill small cracks and surface imperfections, and grinding to smooth rough areas of the mold. These techniques are quick and cost-effective, but larger repairs require more in-depth machining. This is when you need to use a variety of hand tools, including hammers, files, and wrenches.

Injection molds are expensive assets, and they need to be maintained properly in order to get the most out of their lifetime. Well-maintained molds produce high-quality parts with consistent cycle times and help meet production targets, boosting productivity. In addition, well-maintained molds can identify potential safety hazards in the workplace, such as sharp edges and loose components.

A skilled technician can perform a variety of repairs to restore an injection mold to its original condition. A thorough inspection is the first step, but additional methods include welding, grinding, and machining. These methods correct structural defects, remove burrs, and restore the mold’s dimensions. They also improve the performance of the mold by reducing vibration and enhancing wear resistance, making them ideal for high-use molds. Plating is another useful method, as it can add material to worn areas and improve the strength of the injection mold.

Machining

A final machining step is sometimes required to ensure the repaired mold meets specifications. This can include removing any remaining debris or contaminants that may have caused damage during the repair process and ensuring that the welds are strong enough to resist injection pressure. This step also allows the technician to address any dimensional issues that may have been created by the repair process or any other variables.

There are many different types of repairs that can be performed on injection mold tooling, depending on the type and extent of the damage. Some processes are quicker and more affordable than others, but all must be completed properly to guarantee the integrity of the mold and produce a quality product.

Using a variety of welding techniques, technicians weld cracks and build up worn areas to restore the structural integrity of the mold. This can be done on a small scale to repair surface imperfections or with greater precision for more involved repairs such as replacing ejector pins or bushings. The resulting welds must be smoothed and polished to ensure that the injection molding process runs smoothly.

Component replacement is another common repair method. This involves replacing damaged or worn parts in the injection mold to restore its function and reduce maintenance time. Common components that need to be replaced in injection molds include ejector pins, bushings, and guide pins. These are often worn due to mishandling of the mold, but can also result from excessive cycle times or a lack of proper cooling and water lines.

The best way to minimize the number of repairs needed to keep your injection molds running is to perform regular inspections and maintain routine maintenance. Scheduled inspections can help identify problems early and allow you to catch potential issues before they turn into major failures. Inspections should be comprehensive, including a thorough review of all areas of the mold to detect any signs of wear and tear.

It is also a good idea to start planning for mold replacement as soon as you begin seeing significant signs of wear and tear. This will give you the time to explore options for long term maintenance, proactively order back-up components, and consider total mold replacement.

Final Inspection

During this stage, the mold must be thoroughly inspected and cleaned. Any areas that need repair, such as ejector pin holes and cores, are identified and repaired. This is also the time to check the runners and other parts of the mold, as they too can be affected by dust and debris. After cleaning and inspection, the mold must be dry before being stored. This prevents rusting and protects the mold from damage. It is important to note that a detailed final inspection is crucial, as it minimizes the chances of a mold having any hiccups during production. This is why it’s important to set aside enough time to do a thorough job. Effective communication between technicians is also important, especially when a complex mold is being disassembled and reassembled.

The process of repairing plastic injection molds requires the proper skills and knowledge to ensure that the final product is of high quality. The key to successful repairs is to follow a structured sequence that will help reduce mental mistakes and improve overall efficiency. This process has been proven to significantly decrease the cost of a mold repair project by reducing wasted manpower and material.

When choosing a mold repair service provider, it’s important to look for one with industry experience and a good reputation. They should also be able to offer a range of services and provide a warranty on their work. This will give you peace of mind that your project is in good hands and that you’ll receive the best value for your money.

A detailed dimensional inspection is also necessary to check for wears that are not visible to the naked eye, but could affect part quality and production yield. This will help identify problems like air traps and short shots that can result from blocked vents and gates. Other things to look for include a worn leader pin or bushing, which can cause defects in the finished products.

Injection-molding manufacturers need to ensure that their molds are in good condition to minimize downtime and production costs. Regular inspections and maintenance will help them catch potential issues early on, allowing them to make timely repairs and avoid costly downtime.